Logs Explorer Architecture
The Logs Explorer is one screen for searching, aggregating, and clustering every log line Kloudfuse has ingested. This page explains how a log line gets there, what Kloudfuse extracts from it along the way, how the Explorer’s UI is organized, and how a search actually reaches the stored data.
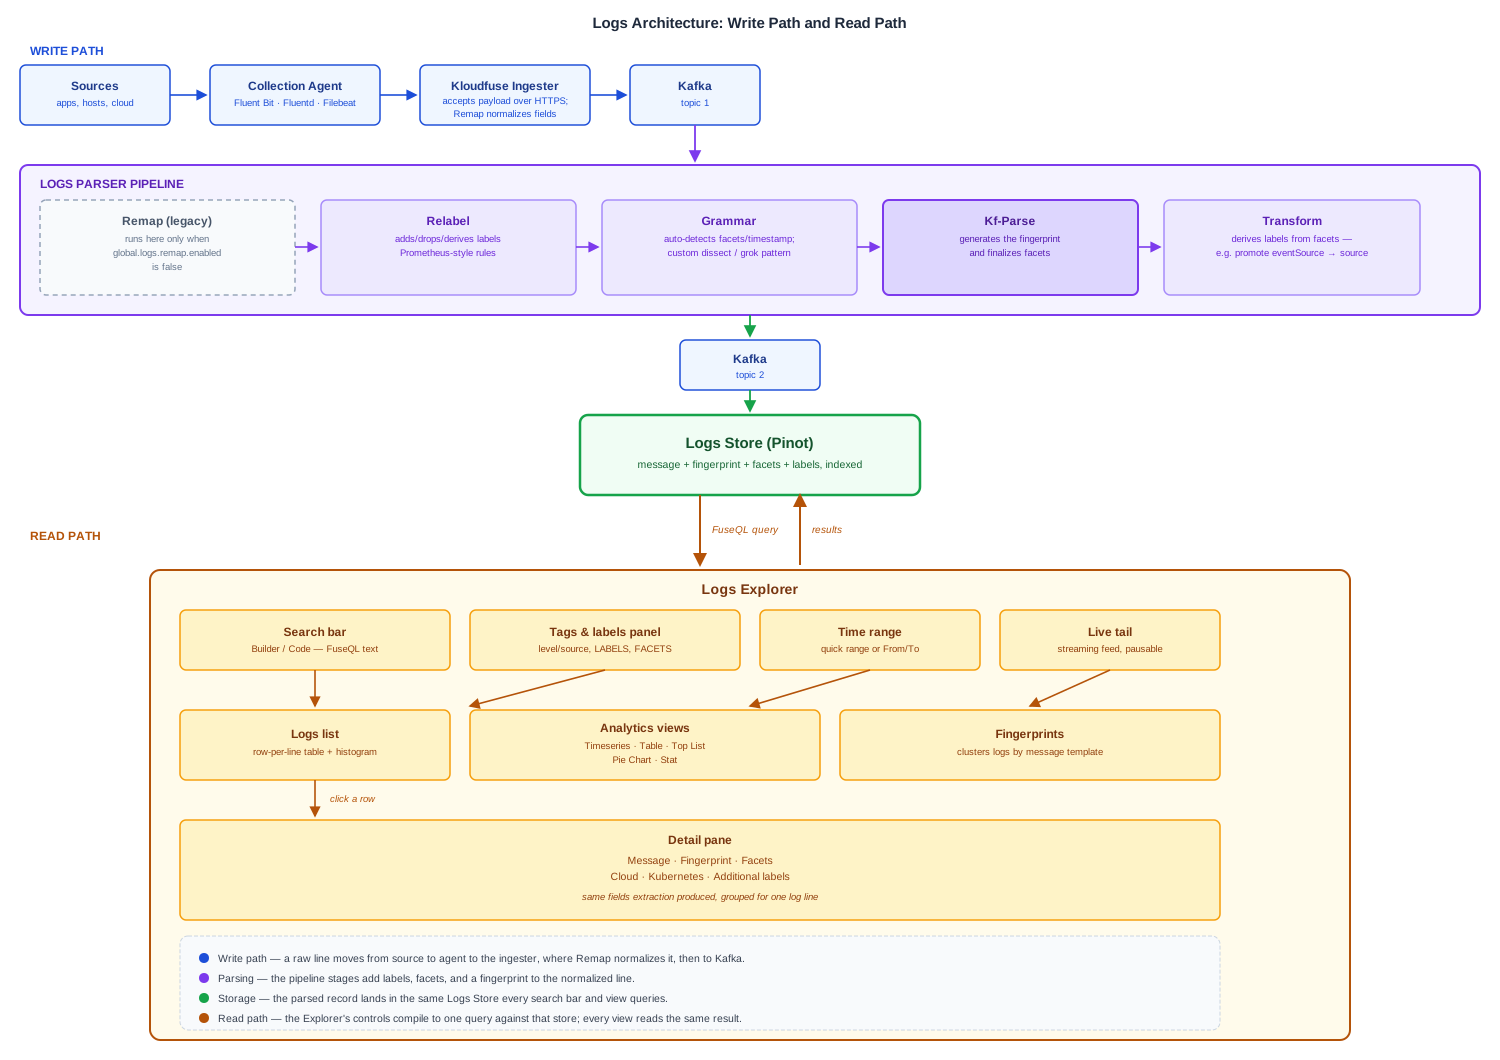
How a log line reaches the Logs Store
Getting logs into Kloudfuse in the first place — which collection agent to run, which ingester endpoint it talks to, how it’s deployed — is its own topic; see Kubernetes Integration Architecture for the Kubernetes collection agents and Log Forwarding Architecture for the dedicated log forwarders (Fluent Bit, Fluentd, Filebeat) and the deployment patterns each suits. This page picks up once a log payload has arrived at the ingester.
-
Ingester: Remap, then Kafka. The ingester accepts the raw log payload over HTTPS and normalizes it with Logs Remap: it maps fields from the incoming payload — in whatever shape your agent sends — onto Kloudfuse’s internal fields (message, timestamp, source) and initial labels, using per-agent rules you edit on the Logs Remap admin page. It then writes the normalized log to a Kafka topic, decoupling ingestion from parsing.
Remap has run in the ingester by default since 4.3.0. When
global.logs.remap.enabledisfalse, the ingester skips it and the Logs Parser runs its deprecated Remap stage instead; see Enabling the remap engine. -
Logs Parser. A dedicated service reads each log off Kafka and runs it through a pipeline of stages:
- Relabel
-
Adds, drops, replaces, or derives labels from what Remap produced, using Prometheus-style relabel rules.
- Grammar
-
Kloudfuse auto-detects facets and a timestamp from the message using a heuristic. If that heuristic isn’t accurate enough for a given log format, define a custom dissect (tokenizer) or grok (named-regex) pattern here to extract fields precisely.
- Kf-Parse
-
Internal and not configurable — this is where Kloudfuse generates the fingerprint (the message’s template, with variable parts replaced by placeholders) and finalizes the facets extracted from it.
- Transform
-
Derives labels from the facets extracted above — for example, promoting a facet like
eventSourceto a label namedsource.
-
Kafka → Logs Store. The fully parsed record — message, timestamp, fingerprint, facets, and labels — is written to a second Kafka topic and consumed into the Logs Store (Pinot), where it becomes searchable.
See Log Parsing Configuration for the full configuration reference (relabel, grammar, and transform syntax with examples), and Remap Concepts for how Remap maps fields, and Log Timestamp Handling for how Kloudfuse picks and validates a log’s timestamp specifically.
Facets, labels, and tags — and why the distinction matters for search
Three kinds of metadata end up attached to a stored log line, and which one a field is determines how you filter on it:
- Facets
-
Fields Kloudfuse extracted from the message itself — either automatically (the Grammar/Kf-Parse stages above) or by a custom dissect/grok pattern you defined. In the search bar these are prefixed with
@(for example@status). - Labels
-
Structured metadata attached to the log at collection time — Kubernetes pod/namespace/cluster, cloud region/zone/account, and any custom labels your agent adds. The Explorer groups these under Cloud, Kubernetes, and Additional in the Tags & labels panel.
- Tags
-
The catch-all extra key/value pairs shown on an individual log’s detail pane alongside its Labels — see Detail pane.
This is also why a log’s Kubernetes and Cloud fields line up with the same fields on a Pod’s own detail pane elsewhere in Kloudfuse: both are populated from the same collection-time labels, which is what lets you correlate a log line back to the exact pod, node, or cloud resource that produced it.
Explorer layout
Click Logs in the top navigation to open the Explorer. Three controls decide what the main pane shows, and they all feed the same query:
-
The sidebar narrows results by label (level, source, and the Cloud, Kubernetes, and Additional groups) and by facet. Checking a value and typing the same filter in the search bar are the same operation.
-
The search bar takes the query itself, in Builder or Code mode; see Logs Search Syntax.
-
The view tabs render the same result set as a raw log list, an aggregation (Timeseries, Table, Top List, Pie Chart, Stat), or fingerprint clusters; see Logs Analytics and Log Fingerprints.
Clicking a log row opens its detail pane, and Live tail replaces the fixed time range with a streaming feed. For how to use each part of the screen, see Logs Explorer.
How a search reaches the data
Whatever you build in the Builder, type in Code, or check in the sidebar compiles to the same thing: a FuseQL query against the Logs Store. The Store already has every facet and label indexed, so filtering on level="error" or @status=500 doesn’t require scanning raw messages — only a term search or a substring/regex match ("error text", @msg=~"timeout.*") touches the message text itself. This is why narrowing by a facet or label first, then adding a text search, is generally faster than a text search alone.
The same query also drives the Logs 200 / Total docs / Scanned counters above the results table: Total docs is how many records exist in the time range before your filter, Scanned is how many the query engine had to read to answer it, and the row count is what’s actually shown.